Set up PostgreSQL and pgAdmin using Docker on MacOS
This is a simple guide that can help you install docker and host PostgreSQL and pgAdmin services locally on containers. Finally, I will help you link your local database with pgAdmin and help you with some classic MacOS issues!
First of all, let’s talk a bit more about the technologies that we are using here:
- Docker is an open-source platform that allows developers to automate the deployment, scaling, and management of applications using containers. Containers are lightweight, portable, and self-sufficient environments that package an application along with its dependencies, libraries, and configuration files.
- PostgreSQL (or Postgres) is a powerful, open-source relational database management system (RDBMS) known for its scalability, reliability, and advanced features. It is designed to handle complex queries and large-scale applications, making it a popular choice for developers and enterprises.
- pgAdmin is a popular open-source administration and management tool for PostgreSQL databases. It provides a graphical user interface (GUI) to help users interact with PostgreSQL without needing to write SQL commands manually.
Let’s start…
Install Docker
- Go to Docker - Get started page and follow instructions on how to install docker. If you are starting now it is strongly recommended to install the docker by downloading the
.dmgfile. - Launch Docker.
Create and run PostgreSQL container
Open the terminal of your choice and run the following command:
docker run --name mypostgres -e POSTGRES_PASSWORD=your_password -p 5432:5432 -d postgres
An important note is that when you are trying to build a container with a specific image, docker first will try to find the image locally, if not then it will try to download it. On our occasion the images will automatically be downloaded from the web (assuming that you do not have them locally). In general everything is automated, which means you do not have to download anything manually (except for docker itself).
docker runis used to create a new container.--name mypostgresassigns the name mypostgres to your new container.-e POSTGRES_PASSWORD=your_passwordsets an environment variable within the container to create a password for the superuser of the database. Replaceyour_passwordwith the password of your choice.-p 5432:5432maps the default PostgreSQL port inside the container (5432) to the same port on your host machine. This mapping allows you to connect to PostgreSQL from applications running on your host system.-d postgresindicates that the container should run in detached mode, using the postgres image. Detached mode means that after setting up your container your terminal will detach from it.
After finishing setting up your container check that it works by writing in your terminal the following command:
docker ps
You should see something like:
❯ docker ps
CONTAINER ID   IMAGE            COMMAND                  CREATED          STATUS          PORTS                           NAMES
f7c00b9af8ee   postgres         "docker-entrypoint.s…"   27 minutes ago   Up 27 minutes   0.0.0.0:5432->5432/tcp          mypostgres
Create and run pgAdmin container
On your terminal run the following command:
docker run --name mypgadmin -p 5050:80 -e '[email protected]' -e 'PGADMIN_DEFAULT_PASSWORD=1234' -d dpage/pgadmin4
Extra commands that are used here are:
-e '[email protected]'which sets an environment variable in the container with the default user e-mail. Replace[email protected]with your e-mail or another dummy e-mail. This (alongside with the password that is on the next bullet) will be used later to connect to pgAdmin.-e 'PGADMIN_DEFAULT_PASSWORD=1234'which sets an environment variable in the container with the default password. Again you could replace1234with the password of your choice.
After finishing setting up your container check that it works by writing in your terminal the following command:
docker ps
You should see something like:
❯ docker ps
CONTAINER ID   IMAGE            COMMAND                  CREATED          STATUS          PORTS                           NAMES
6ef30a44fb2d   dpage/pgadmin4   "/entrypoint.sh"         24 minutes ago   Up 24 minutes   443/tcp, 0.0.0.0:5050->80/tcp   mypgadmin
f7c00b9af8ee   postgres         "docker-entrypoint.s…"   27 minutes ago   Up 27 minutes   0.0.0.0:5432->5432/tcp          mypostgres
Access pgAdmin and connect it with PostgreSQL database
- Now, that your containers are up and running open the browser of your choice and go to
localhost:5050. - Log in to pgAdmin using the username/password combination that you set for
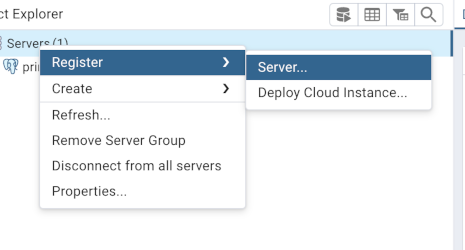
PGADMIN_DEFAULT_EMAILandPGADMIN_DEFAULT_PASSWORDenvironment variables on the previous step. - After logging in to pgAdmin panel find
Serveron the left of the page, right click to it and then selectRegister>Server.
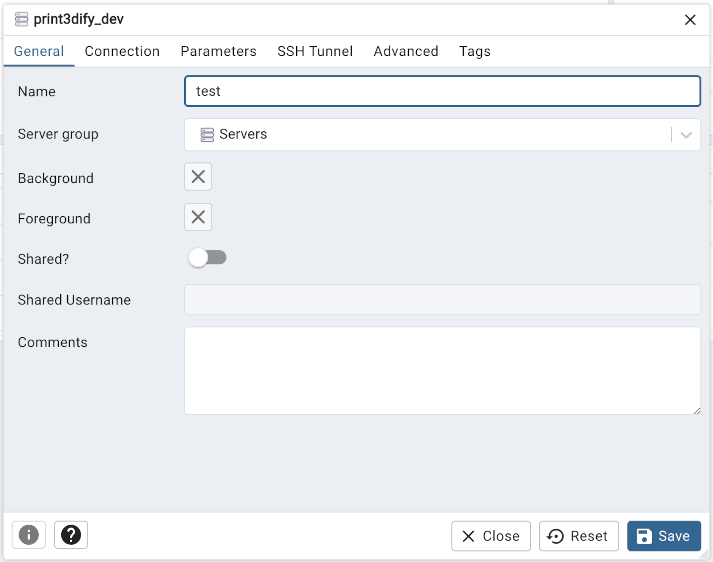
- On the new panel that opens, under
Generaltab add any name you want for your database underNameattribute.
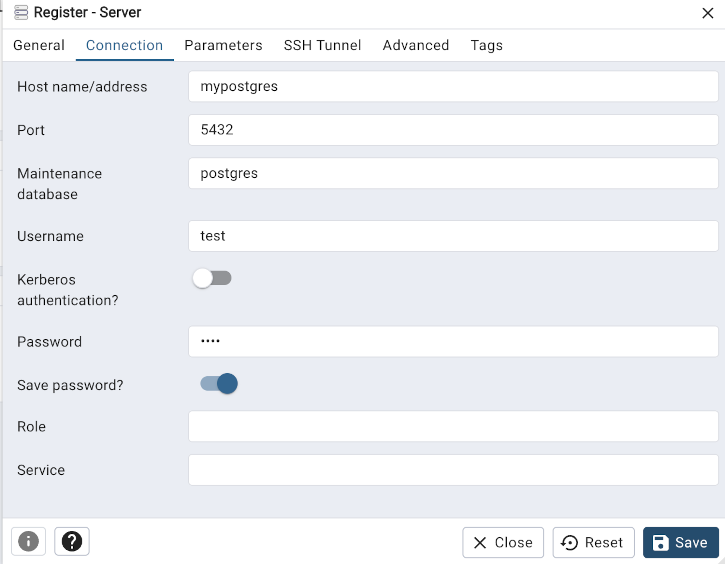
- Switch to
Connectiontab.
- Set
Hostname/Addressto the name of your PostgreSQL container, on our occasion it ismypostgres. - Set
Portto5432(your PostgreSQL is accessible through this port on your local machine). - Set
Usernametopostgres, which is the default superuser on PostgreSQL. - Set the
Passwordto the password you specified when created the PostgreSQL container. - Check the
Save passwordcheckbox, so you do not have to add it again in the future.
- Save your new database! pgAdmin will try to connect to your database using the configuration that you added.
- If you are following an error that says:
[Errno -2] Name does not resolve
This means that docker cannot automatically resolute the container names to their respective IP addresses using its internal DNS. Ideally both containers could be part of a custom bridge network for automatic DNS resolution. If not added explicitly they will be part of the default bridge network.
So what does it means?
It means that something is messed up and you have to explicitly set the IP address of your PostgreSQL in the pgAdmin configuration.
How to find your container’s IP address?
- To find out the networks created in your docker runtime, type on your terminal:
docker network ls
- Some networks will be listed in the console, maybe you’ll find a [name]_default which should be your network. Another common network name that might the correct one is the
bridge(its’ name isbrige) network itself. - Execute command:
docker network inspect bridge
Replace bridge with [name]_default if you are using that one!
It should respond with a JSON object like this:
❯ docker network inspect bridge
[
    {
        "Name": "bridge",
        "Id": "60fefa4db92dd0ee4657764c3c9f867e32bcde20165db5adb8bf46dc88b540f9",
        "Created": "2025-02-25T20:55:57.82807825Z",
        "Scope": "local",
        "Driver": "bridge",
        "EnableIPv6": false,
        "IPAM": {
            "Driver": "default",
            "Options": null,
            "Config": [
                {
                    "Subnet": "172.17.0.0/16",
                    "Gateway": "172.17.0.1"
                }
            ]
        },
        "Internal": false,
        "Attachable": false,
        "Ingress": false,
        "ConfigFrom": {
            "Network": ""
        },
        "ConfigOnly": false,
        "Containers": {
            "6ef30a44fb2d7440878f86ea1f32becbcf82f295b495390af99573010c471787": {
                "Name": "mypgadmin",
                "EndpointID": "8342cc3e52de366ff0d066080724ac8f3d805e3a661837eb9cd9d0cc49a2d2d0",
                "MacAddress": "02:42:ac:11:00:03",
                "IPv4Address": "172.17.0.3/16",
                "IPv6Address": ""
            },
            "f7c00b9af8ee9b059b5aa857541c397196fe2997ab584918fe5a23d791e9a8d8": {
                "Name": "mypostgres",
                "EndpointID": "6ee183eb02bba387df31e25efc4f53d6f496d9755f78b6ed4b671d4dfadea3b7",
                "MacAddress": "02:42:ac:11:00:02",
                "IPv4Address": "172.17.0.2/16",
                "IPv6Address": ""
            }
        },
        "Options": {
            "com.docker.network.bridge.default_bridge": "true",
            "com.docker.network.bridge.enable_icc": "true",
            "com.docker.network.bridge.enable_ip_masquerade": "true",
            "com.docker.network.bridge.host_binding_ipv4": "0.0.0.0",
            "com.docker.network.bridge.name": "docker0",
            "com.docker.network.driver.mtu": "65535"
        },
        "Labels": {}
    }
]
The important part is in Containers, to the entry with "Name": "mypostgres". Get the IP address (on our example it is 172.17.0.2) and use it directly in pgAdmin (instead of using mypostgres - the container name).
4. Now, try to save! It should work!
Conclusion
Well done, setting up your PostgreSQL and pgAdmin using Docker! You have developed an efficient way to deploy these powerful tools by packaging them in Docker containers, making them easier to use and manage. This approach enhances your development workflow while providing a strong foundation for advanced database management.
Have a good time experimenting with this! :)